Prev
- A VIEW in SQL is nothing but a virtual table. It has columns & rows just like a physical/real table. The columns & rows in this virtual table will be based on the result-set of the SQL statement that we use to create the VIEW.
- A VIEW will always display current data, whenever it is used.
- Generally, a VIEW is created when we need columns from different tables in one table. Syntax for SQL VIEW is given below
SQL Syntax for VIEW:
| SQL Syntax for VIEW | CREATE VIEW view_name AS SELECT t1.column_name1, t2.column_name2, etc FROM table_name1 AS t1, table_name2 AS t2 etc WHERE [condition]; |
Note:
- You can use either single table to create VIEW or multiple tables with multiple columns in the SQL statement as per your requirement.
- This SQL statement is nothing but the normal SQL query that you use to fetch the data based on your requirement.
Example for how to use VIEW in SQL:
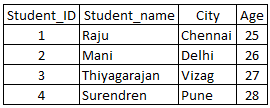
Please consider following 2 tables with few records as given below.
Table1:
Table name (for example): student1
Column names in this table: Student_ID, Student_name, City and Age
Available records: 4 rows

Table2:
Table name (for example): student2
Column names in this table: Student_ID, Department, College and Rank
Available records: 4 rows

Please execute below query in SQL to create a VIEW on this query.
SQL query:
CREATE VIEW STUDENT_RECORDS AS
SELECT s1.Student_name, s1.City, s2. Department, s2.Rank
FROM student1 AS s1, student2 AS s2
WHERE S1.Student_ID = s2.Student_ID;
Description:
- In the above SQL query, 4 columns are selected from 2 different tables by joining common field ‘Student_ID’ from both tables. And then, VIEW is created on the result set of this SQL query in the name of ‘STUDENT_RECORDS’.
- After VIEW is created, we can execute below SQL to get the result set of the VIEW. This is equal as the result set of SQL query.
- SELECT * from STUDENT_RECORDS;
- Always, latest records will be fetched every time VIEW is executed.
SQL query Output:

How to UPDATE an existing VIEW?
To update an existing VIEW, you can use below Syntax. In below example, we have added one extra column in VIEW list which is highlighted below.
Syntax:
CREATE OR REPLACE VIEW view_name AS
SELECT t1.column_name1, t2.column_name2, t2.column_name3 etc
FROM table_name1 AS t1, table_name2 AS t2 etc
WHERE [condition];
Example:
CREATE OR REPLACE VIEW STUDENT_RECORDS AS
SELECT s1.Student_name, s1.City, s2. Department, s2.Rank, s2.college
FROM student1 AS s1, student2 AS s2
WHERE S1.Student_ID = s2.Student_ID;
How to DROP a VIEW?
To DROP a VIEW, you can use below Syntax.
Syntax:
- DROP VIEW view_name;
Example:
- DROP VIEW STUDENT_RECORDS;
